🌬️ Elevate your space with breeze that’s smart, silent, and seriously stylish.
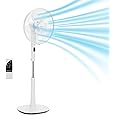
The Amazon Basics 16" DC Motor Fan combines cutting-edge 28W energy-efficient motor technology with a unique 10-blade dual-layer design to deliver a soft, natural breeze. Featuring 12 speed settings, 3 specialized modes, adjustable height, and remote control, it offers customizable, quiet cooling ideal for medium to large rooms—all wrapped in a sleek, modern profile perfect for any professional space.
M**.
The Fan Is Great. Their directions SUCK but here are better ones ;)
Well, here I am a year later to report this oscillating fan suddenly decided to do something VERY bad. It put out a loud electrical 'snap' & the fan blades stopped working. Oh, it still oscillates but it can't go fast enough going just side-to-side to generate a breeze. Of course this happened just one week past it's one year warranty. (LOL) I do like the fan, so I'll probably buy another next Spring.As to my original review: If you’re looking for a very nice oscillating fan with an excellent remote this one is a very good value. HOWEVER, first you have to assemble it. If I didn’t know better & it didn’t have the AmazonBasics® logo I swear the instructions were designed by IKEA®. [Anyone who’s ever tried to assemble that particular brand of furniture knows what I’m talking about.] I guess when they say 'Basics', they mean it.For those who are considering purchasing this item & wants to escape [most of] the assembly frustration here are some of the high points NOT covered in the instruction manual:1) Go ahead & unpack everything. You will find all the parts there… someplace, somewhere.2) Assembly of the base is dead easy. Pg. 6- 7. Unscrew the knob off the bottom, insert the stand & tighten the knob.3) Following the directions…what little there are…slide main unit onto standard & tighten those knobs. I should mention that the LOWER knob is the one you loosen/tighten in order to extend the fan higher or lower. The other knob secures the main housing to the extendable arm. This isn’t mentioned till page 13. But, so far, so good. Now comes the good parts!4) Remove the large fan blades off the back of the unit. Remove the Star Trek insignia shaped piece of plastic which is clipped to the blades. (I couldn’t for the life of me figure out what that thing was doing there or if I should take it off. It certainly looks like it belongs but it eventually it dawned on me this was just basically excess material.) Go ahead and toss it because it’s what’s known in the vernacular as a pocket part…just something they stuck on & it looks like you need it but it’s never mentioned. Put the blades aside for now.5) Look on the shaft sticking out on the base. That’s where the knob you’ve been looking for is. It's not mentioned but you need a pair of pliers to hold the shaft while you turn the knob RIGHT in a reverse fashion to unscrew it. DON’T mess with the pins sticking out of the shaft, you’ll need them later. [Note: this is the opposite of the normal ‘lefty-loosey, righty-tighty’]6) Now that you have the knob off go ahead & slide that black sheath off the post. Guess what, you get to throw that away too! It took me probably 15 minutes to figure out the blades’d never fit on the shaft with the sheath on. Turns out that piece wasn’t needed, either. Please note its presence is not mentioned anywhere in the directions.7) Now that you have all the nice things they never told you about out of the way, go ahead and unscrew the fixing ring of the main unit’s front. You can do this by hand. Mount the rear fan guard onto the shaft with the 2 pin holes facing up & the single pin facing down.[You’re still on page 7] Screw on the fixing ring [not the small screw you took off the shaft] until it’s hand tight.8) Now slide the large blades onto the shaft. If you look on the base of the fan blades you’ll see a small notch which has to be aligned with the pins on the shaft. You have to twist around & back to see the slot. Line them up & slide on the blades.9) The smaller blades (this is a dual blade set) slide onto the shaft next with the tiny teeth facing out. [Didn’t think I’d make you guess, did you? The manufacturer did.] Now use that small knob you took off the shaft in Step 5 to affix all the blades in place. Remember, this is ‘left-to-tighten’ instead of the normal ‘turn right for tight’.10) NOW comes the super fun part & it's definitely not in the directions. Take the main unit back OFF the base and lay on something flat like a bed or the floor. At this point I needed a VERY small Phillips head screwdriver (~1/32”), a 2nd person & a few strips of duct tape to manage this step.11) There is a rubber strip with a screw at the bottom you have to wrap around the back fan guard, blades and all & the front one at the same time with everything EXACTLY lined up. The part with the screw goes at the bottom of the guards. You can’t hold the 2 parts together easily, so that’s where the duct tape comes in. I used 3 1”x ¼”strips, [though if you strip 2 or 3 twist ties down to the wire & use them to secure pieces I think they’d work even better], just enough tape to help plus my spouse to hold the front & back guards together while I fit the rubber ring around them.This step took more than 30 minutes to accomplish with the guards sliding all over the place, the duct tape coming loose because you can’t leave it on, trying to open the ring just enough to let it go around the 2 pieces, fitting the ring's track around both while my husband’s using a magnifying glass to see well enough to tighten the screw all while I’m trying to hold everything stable with pillows stuffed around the base to keep it from turning & twisting. Get the idea? I think we both learned a few new 4 letter words with this last step.If you don’t have the type of screwdriver in your home toolbox you can get one in the eyeglass repair kits at the local CVS or Walgreens. They’re about 5 bucks so. Once you get it tightened, you should be done. Don’t bother looking for a nut on the end of the screw as there isn’t one, which is a very strange design. Normally this means you can’t keep loosening/tightening the screw without stripping the mounting. I wouldn’t know; once we got started with tightening of the screw we just kept going as best we could until we got both guards together.12) Replace the main unit back on the stand & tighten the knobs.13)The remote is nothing after all that. Slide off the cover, pop in 2 AAA batteries, slide the cover back on & you're good to go.I will say it’s really nice to have a remote-controlled oscillating fan. I can control on/off, speed, mode, isolation & a timer for sleep. I just wish somebody taught AmazonBasics® how to write directions.
M**R
Excellent Fan....terrible instructions, but you CAN make it work. Read on.
Assembly was somewhat difficult. More so than necessary. While some things are obvious, and a fan is not a complex piece of machinery, where the diagram shows parts included, and picture states "screw" quantity of one, you begin to wonder where it might be. What bag of parts is missing from the box which had a flap open upon delivery? It was determined that it was already in the assembly it was needed in. You just remove it before you assemble.Assembling the fan shroud to the motor was also less than straightforward. If they would show the rather oddly shaped fastening nut as a separate drawing, it would be much easier to distinguish mounted on the motor already. (notice the theme here---- hint---part is already where needed). While a great idea in general, it is different from American norms of bag of parts, sorted through, and calling company for lost part replacement. Wait a minute, they might be onto something here...... Yes I'm kidding....just know going into the box that all pieces needed are already in place. Just remove, then reuse. KISS principle at its finest.Fan performance is great. Quieter than most even at full gale force breeze. This will sit in my garage while working on summer projects in the South East US. Seems pretty solidly built on day one anyway. I like.
M**I
Very good fan to beat the summer heat!
This is a great fan. First off, it blows really strong even at the lowest setting, which would have been between #2 and #3 setting on the old one that I had which just broke. It has different modes that displays the "moon" and the "tree" which to me seems like the breeze mode. I just can't tell the difference between the two modes because they seem the same to me. It oscillates and you can turn the head up or down. It also has a built in timer which is convenient although in this summer heat I don't think I'll ever turn it off.I also like the size. It's head is small enough not to take too much space. There is a second fan blade that is built-in with the "screw" that tightens the main blade. I'm not sure if it's really helping to blow more air because it's really small but it's there. The base is not that big either and the whole thing is pretty stable. It does feel a little heavy. It comes with a remote control which is very convenient when you're already settled in bed.Overall, this fan will surely help beat the summer heat. I'm already thinking of getting another one before they run out because I've noticed that the stores around my area usually runs out of these during summer where we get triple digit temps. I highly recommend this fan from Amazon!
T**4
A Basic Fan with a Remote.
We burn up one of these pedestal fans every three to four years since we use them heavily living in an area were it is over 100F for at least three months of the year, and often closer to 4. This time, we're trying the Amazon basics model which has the added niceties of a very basic remote, a timer and the ability to change the fan's running pattern beyond just Low/Medium/High.The fan is primarily made of plastic, and slips together with only the need of a Phillips screwdriver for a single screw. The up/down tilt is more limited than fan's we've had in the past, and the side-to-side oscillation seems to be about 10 to 15 degrees less than older models. It isn't as quiet as I would have expected, but it does push the air well. I don't know if the 'stacked' blade actually moves more air or not.I appreciate that the control panel on the fan 'sleeps' after about a minute so that the bright LEDs aren't glaring constantly, but I really wish the remote had a some backlighting. I also don't expect the remote to last very long- it is very sub-par construction.If we get a least two Summer's use out of this fan, we'll consider it a good buy.
Trustpilot
1 month ago
2 weeks ago